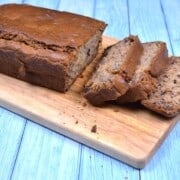
Finding a sugar-free banana bread that actually tastes like a treat-and doesn't turn out dense, dry, or rubbery-can feel like an impossible task. Many alternative baking recipes rely heavily on artificial sweeteners or sugar alcohols that leave a strange, bitter aftertaste.
This healthy no added sugar banana bread is completely different. It contains zero artificial ingredients, zero syrups, and zero granular sugar substitutes. Instead, it relies 100% on the natural sweetness of ultra-ripe bananas to create a deeply flavorful, incredibly moist sugar-free banana loaf.

Whether you are looking for a wholesome breakfast, a toddler-friendly snack, or simply want to cut down on processed ingredients, this fail-proof recipe delivers that classic, cozy banana bread texture without a single grain of added sugar.
Jump to:
- What Sweetens This Banana Bread Naturally?
- Why You'll Love This Sugar-Free Banana Bread
- Ingredients for a Moist Sugar-Free Loaf
- How to Make Sugar-Free Banana Bread (Step-by-Step)
- Step 4: Fold in the Fruits and Sour Cream
- Recipe Variations to Try
- How to Serve Sugar-Free Banana Bread
- Storage and Freezing Instructions
- Top Tips for the Perfect Sugar-Free Loaf
- Frequently Asked Questions & Troubleshooting
- Final Thoughts & More Recipes to Try
- Join the Community!
- Related
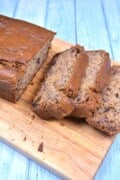
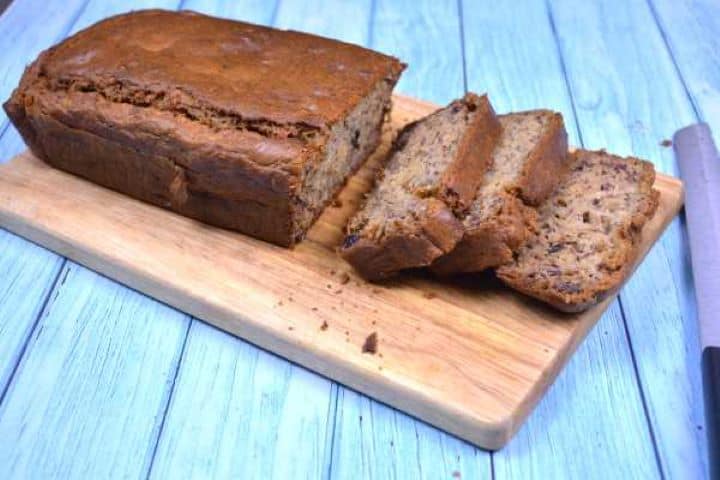
- The Best Sugar-Free Banana Bread
What Sweetens This Banana Bread Naturally?
While many modern variations of this classic loaf rely on alternative sweeteners like maple syrup, honey, or coconut sugar, this recipe keeps things completely whole-food based.
The secret to this deeply flavorful loaf is a dual-threat combination: the natural sugars of overripe bananas paired with juicy raisins. As the bread bakes, the raisins plump up, releasing pockets of intense, natural sweetness and moisture throughout the crumb.
Customise Your Loaf
This naturally sweetened base is incredibly versatile. If you want to add texture or a twist of flavor, you can easily fold in:
- Crunchy Nuts: Chopped walnuts, pecans, or hazelnuts.
- Spices: An extra pinch of cinnamon or a dash of nutmeg.
- Mix-ins: Sugar-free dark chocolate chips or a handful of fresh blueberries.
Why You'll Love This Sugar-Free Banana Bread
This recipe has quickly become a family favorite in our kitchen, and not just because it tastes incredible. Here is why you'll want to keep this recipe on repeat:
- Zero Food Waste: It is the ultimate way to rescue overripe, brown bananas from being thrown away. The uglier and spottier the bananas, the sweeter your bread will be!
- One-Bowl Simplicity: There are no complicated steps or fancy equipment required. You simply mix the ingredients together, pour the batter into your loaf tin, and let the oven do the hard work.
- Excellent for Meal Prep: This loaf stores beautifully. Kept in an airtight container or food bag, it stays soft and moist for days.
- Freezer-Friendly: You can freeze the entire loaf or pre-slice it for a quick, grab-and-go breakfast. Just thaw a slice at room temperature or pop it straight into the toaster.
Ingredients for a Moist Sugar-Free Loaf
To make a banana bread that is naturally sweet and perfectly tender without any added sugar, every single ingredient has to work a little harder. Here is what you will need to gather:
- Ultra-Ripe Bananas: This is your primary sweetener. Look for bananas that are heavily speckled with black spots or completely brown. The riper they are, the higher their natural sugar content and the stronger the banana flavor.
- Juicy Raisins: Our secondary natural sweetener. They add delightful, sweet pockets of flavor and texture throughout the loaf.
- Sour Cream: The secret weapon for a perfectly moist crumb! Because this recipe has no sugar to lock in moisture, sour cream steps in to add richness and keep the bread incredibly soft and tender.
- Flour: Plain all-purpose flour provides the essential structure for the loaf.
- The Fat (Butter or Oil): Works alongside the sour cream to coat the flour proteins, ensuring your sugar-free loaf stays soft for days.
- Eggs: Provide the necessary structure, lift, and binding to keep the heavy fruit batter from sinking.
- Baking Powder & Baking Soda: Our leavening agents that work together to give this dense, fruit-packed bread a beautiful rise.
- Cinnamon & Vanilla Extract: A generous pinch of ground cinnamon and a splash of pure vanilla extract to enhance the natural sweetness of the bananas and give the bread that classic, cozy aroma.

How to Make Sugar-Free Banana Bread (Step-by-Step)
If you are visual learner, I have recorded the entire process showing you exactly how to mix this batter to get the perfect moist consistency. You can watch the full video tutorial below to see how easily this loaf comes together before you get started!
If you enjoy the video, don't forget to subscribe to the channel for more healthy, traditional baking ideas!
Once you have watched the video, follow these simple step-by-step instructions to bake your loaf:
Step 1: Prep the Bananas and Raisins
Start by peeling your three large, overripe bananas. Place them on a plate or in a bowl and mash them thoroughly with a fork until you achieve a smooth banana mash; this will be effortless if your bananas are nice and soft. In a separate small bowl, place your 50g of raisins and cover them with warm water to soak, which plumps them up and helps them stay incredibly juicy. Set both aside.

Step 2: Whisk the Eggs and Melted Butter
Preheat your oven to 160°C Fan (320°F) and line a standard loaf pan with baking paper. In a large mixing bowl, combine the two eggs, the teaspoon of cinnamon powder, and the teaspoon of vanilla extract. Beat them together using an electric mixer or a whisk until the mixture is light, foamy, and fragrant. Next, gradually pour in the 110g of melted butter, continuing to mix until you have a smooth, creamy consistency.

Step 3: Mix the Flour and Dough Base
Sift your 220g of self-rising flour directly over the beaten egg mixture, and add one teaspoon of sodium bicarbonate (baking soda). Using a spoon or a spatula, mix the ingredients together just until all of the flour is fully incorporated. At this stage, you will have a thick dough base.
Step 4: Fold in the Fruits and Sour Cream
Drain your soaked raisins. Add the mashed banana puree and the plump raisins directly into your flour dough. Mix gently with your spatula; you will notice the dough immediately softening as the bananas are incorporated.

Finally, add the two tablespoons of sour cream and give it a final, gentle mix. Your dough will turn into a beautifully creamy, slightly fluid batter, similar to a thick pancake batter.

Step 5: Bake to Golden Perfection
Pour the creamy batter into your prepared loaf pan, smoothing out the top. Place it into the preheated oven and bake for approximately 45 to 55 minutes.

The sugar-free banana bread is ready when a toothpick inserted into the very center comes out completely clean. Let the loaf cool on a wire cooling rack before slicing and serving!

Recipe Variations to Try
While this naturally sweetened loaf is incredible on its own, the base recipe is highly adaptable. If you want to experiment with different textures or dietary needs, here are a few clean, tried-and-tested variations to try in your kitchen:
- Sugar-Free Banana Nut Bread: If you love a bit of crunch in your loaf, fold in 50g of chopped walnuts or pecans at the exact same time you add the mashed bananas and raisins. The combination of soft, juicy raisins and crunchy nuts elevates the texture beautifully.
- Sugar-Free Chocolate Chip Banana Bread: For a healthier dessert option, you can swap out the raisins (or keep them!) and fold in a handful of high-quality, sugar-free dark chocolate chips or cacao nibs into the final batter.
- Dairy-Free Sugar-Free Banana Bread: To make this recipe completely dairy-free, simply swap the 110g of melted butter for an equal amount of melted coconut oil or a vegetable-based oil. For the sour cream, you can use a thick, unsweetened coconut cream or a dairy-free yoghurt alternative.
- Spiced Berry Twist: If you aren't a fan of raisins, you can replace them with dried cranberries or even fresh blueberries. If using fresh blueberries, gently fold them into the batter at the very end so they don't burst and turn your dough purple.
How to Serve Sugar-Free Banana Bread
Because this loaf is naturally sweetened and packed with moisture from the sour cream, it is incredibly versatile. Here are a few of the best ways to serve it to your family:
- The Classic Warm Slice: Serve it slightly warm or toasted, with a thin spread of real butter melting into the crumb. The savory butter pairs perfectly with the sweet pockets of raisins.
- A Wholesome Breakfast: Pair a thick slice with a cup of morning coffee or tea. It also makes a fantastic, low-mess finger food for toddlers and young children since it contains no sticky refined sugars.
- The Afternoon Snack: Top a room-temperature slice with a dollop of Greek yoghurt or a drizzle of warm almond butter for a protein-packed afternoon pick-me-medium.

Storage and Freezing Instructions
Baked goods without refined sugar require proper storage to maintain their soft texture. Because sugar acts as a preservative, a sugar-free loaf can dry out faster if left on the counter uncovered. Fortunately, the sour cream in this recipe keeps it soft for much longer!
How to Store at Room Temperature
Allow the banana bread to cool completely on a wire rack. Placing warm bread into a container will create steam, making the crust soggy. Once cooled, place the loaf inside an airtight food bag or a container. It will keep beautifully at room temperature for 3 to 4 days.
Can You Freeze Sugar-Free Banana Bread?
Yes, this loaf freezes beautifully for up to 3 months. For the best results, follow this easy method:
- 1. Slice it First: Always slice the banana bread before freezing. This allows you to pull out just one or two slices at a time without thawing the entire loaf.
- 2. Wrap Securely: Place pieces of baking paper between the slices so they don't stick together, then place them into a heavy-duty freezer bag, pressing out as much air as possible.
- 3. How to Reheat: When you are ready to eat, simply pop a frozen slice directly into your toaster on a low setting, or let it thaw at room temperature for 15-20 minutes. It will taste just as fresh as the day it was baked!

Top Tips for the Perfect Sugar-Free Loaf
Baking without refined sugar is a science, and because this recipe uses a unique mixing method to build its structure, a few small details make all the difference. Follow these expert tips to ensure your banana bread turns out perfectly light, moist, and sweet every single time:
- The Blacker the Bananas, the Better: Since we aren't using sugar or artificial sweeteners, 100% of the base sweetness comes from the fruit. Wait until your bananas are heavily speckled with black dots or completely brown. Yellow bananas will make the bread taste bland and starchy rather than sweet and caramelized.
- Don't Skip the Raisin Soak: Soaking your raisins in warm water for a few minutes before adding them to the dough is a total game-changer. It plumps them up so they don't draw moisture out of your batter while baking, keeping the crumb incredibly soft.
- Fold Gently at the End: When you add your mashed bananas, soaked raisins, and sour cream into the thick flour dough, use a spatula and fold gently. Over-mixing at this final stage will develop too much gluten, which can make your sugar-free bread turn out dense or rubbery instead of tender.
- Let it Cool Completely Before Slicing: It is incredibly tempting to slice into a warm loaf straight out of the oven, but sugar-free bakes need time to set their structure as they cool. Slicing it while it's still hot can cause the bread to crumble. Give it at least 20-30 minutes on a wire rack.
Frequently Asked Questions & Troubleshooting
Sugar-free banana bread usually turns out dense for two specific reasons:
1. Over-mixing the batter: Once you sift the self-rising flour into the egg mixture to form the dough, mix it only until the flour disappears. Over-working the flour at this stage develops too much gluten.
2. Using under-ripe bananas: Yellow or green-tipped bananas contain too much starch and not enough liquid sugar, which makes the final loaf heavy and dry.
Yes, you can substitute the self-rising flour. To make your own self-rising blend for this recipe, use 220g of plain all-purpose flour combined with 2 teaspoons of baking powder. Do not skip the extra teaspoon of sodium bicarbonate (baking soda) called for in the recipe, as it is still needed to react with the acidity of the sour cream.
If your loaf is crumbling, it is likely because you sliced it while it was still hot. Because this recipe contains no refined sugar to caramelize and bind the structure together tightly, the bread relies on cooling down to set completely. Let your loaf rest on a wire rack for at least 20 to 30 minutes before cutting into it.
While it isn't strictly mandatory, soaking the raisins in warm water is highly recommended. Dried raisins act like little sponges; if you add them to the batter completely dry, they will absorb the moisture from your dough while baking, which can leave your banana bread dry. Soaking them ensures they stay plump and juicy.
Yes! This recipe is excellent for young children and toddlers because it contains zero refined sugars, zero honey, and zero artificial sweeteners. The sweetness comes entirely from whole fruit. Tip: If serving to younger babies, you can finely chop the raisins before soaking them to eliminate any potential choking hazards.
Because of the heavy fruit content and the moisture from the sour cream, the interior takes time to set. The loaf is fully baked when the top is deep golden brown, the center feels springy to a gentle touch, and a toothpick or metal skewer inserted into the thickest part of the center comes out completely clean with no wet batter attached.
Final Thoughts & More Recipes to Try
This sugar-free banana bread has truly found a permanent place in my heart, and it has quickly become one of our family's absolute favorite treats. It is proof that you don't need refined sugars to create something wonderfully sweet and comforting.
If you give this recipe a try, please leave a comment and a star rating below! I would love to hear how your loaf turned out and if you added any fun variations.
If you enjoyed this bake, you might also love some of my other tried-and-tested recipes from the kitchen:
Comforting Cakes & Desserts
- Gluten-Free Yoghurt Cake - Another wonderfully light and moist cake option.
- The Best Russian Cheesecake Recipe - Rich, creamy, and perfect for a weekend treat.
- Floating Island Cake Recipe - A spectacular, traditional dessert that always impresses.
- Easy Black Forest Cake Recipe - For those days when only chocolate will do!
Traditional Heritage Bakes
- Best Cottage Cheese Dumplings - A classic, fluffy comfort food favorite.
- Hungarian Plum Dumplings - Perfectly sweet plums wrapped in a tender potato dough.
- Noodle Kugel With Raisins - A beautifully spiced, traditional sweet noodle bake.
- Sweet Fried Semolina Pudding Recipe - A cozy, nostalgic dessert that comes together in minutes.
Breakfast Favorites
- Easy Cinnamon Apple Pancakes Recipe- The perfect companion to your morning coffee.
Join the Community!
Want to see behind-the-scenes action and never miss a brand-new recipe? Let's stay connected! You can find us sharing daily baking inspiration, kitchen tips, and delicious food videos across all our social platforms:
- Subscribe on YouTube: Click here to subscribe to @timeaskitchen. Watch us step-by-step in the kitchen and see exactly how our recipes come to life!
- Pin it on Pinterest: Love this recipe? Pin it to your favorite baking boards so you can easily save it and make it later.
- Follow on Facebook & Instagram: Come say hello on Facebook and Instagram! We love seeing photos of your kitchen creations, so be sure to tag us if you bake this sugar-free loaf.
Related
Looking for other delicious dessert recipes like this? Try these:


The Best Sugar-Free Banana Bread
Equipment
- 1 electric mixer
- 1 mixing bowl
- 1 loaf baking pan
- 1 spatula
Ingredients
- 3 pieces bananas ripe, large, heavily speckled or brown
- 50 g raisins soaked in warm water
- 220 g wheat flour self rising, or 1 ½ cups
- 1 teaspoon sodium bicarbonate baking soda
- 2 pieces eggs large, free-range
- 110 g butter unsalted, melted
- 2 tablespoon sour cream
- 1 teaspoon vanilla extract
- 1 teaspoon cinnamon powder
Instructions
- Prep the Fruits: Peel the bananas and mash them well on a plate with a fork until smooth. In a small bowl, soak the raisins in warm water to plump them up. Set both aside.
- Whisk the Wet Base: In a large mixing bowl, beat the eggs with the cinnamon powder and vanilla extract using a whisk or electric mixer until foamy. Gradually add the melted butter and continue mixing until creamy.
- Add the Flour: Sift the self-rising flour and sodium bicarbonate directly over the egg mixture. Mix gently with a spoon or spatula just until all the flour is incorporated into a thick dough.
- Incorporate and Soften: Drain the soaked raisins. Add the mashed bananas and the raisins to the dough, mixing gently. Finally, fold in the sour cream until you have a smooth, slightly fluid, creamy batter.
- Bake: Pour the batter into a loaf pan lined with baking paper. Bake in a preheated oven at 160°C Fan (320°F) for 45-55 minutes until a toothpick inserted in the center comes out clean. Cool completely on a wire rack before slicing.
Video
Notes
- Banana Ripeness is Key: Because this recipe contains absolutely no sugar, the sweetness relies entirely on your bananas. They should not just be yellow with a few spots-they should be heavily brown or completely black. If your bananas aren't ripe enough, the bread will taste bland and have a heavy, starchy texture.
- Don't Forget to Drain the Raisins: After soaking your raisins in warm water to plump them up, make sure to drain the excess water thoroughly before folding them into the dough. Adding too much extra water will throw off the fluid balance of the batter.
- Plain Flour Substitution: If you do not have self-rising flour on hand, you can easily make your own. Substitute the 220g of self-rising flour with 220g of plain all-purpose flour plus 2 teaspoons of baking powder. Keep the 1 teaspoon of sodium bicarbonate (baking soda) in the recipe as written, as it reacts with the sour cream.
- Sour Cream Options: For the best texture and moisture, use full-fat sour cream. If you don't have sour cream, full-fat unsweetened Greek yoghurt works perfectly as a 1:1 substitute and provides the same necessary acidity to soften the crumb.
- Oven Temperatures: If you are using a standard conventional oven without a fan, increase the baking temperature to 180°C (350°F). Keep the baking time the same, but start checking the center with a toothpick around the 45-minute mark.
- Storage Tip: Store leftovers in an airtight food bag or container at room temperature for up to 4 days, or freeze individual slices wrapped in baking paper for up to 3 months. To serve from the freezer, pop a slice straight into the toaster!
Nutrition
This post contains affiliate links. Read the full disclosure here.


Leave a Reply