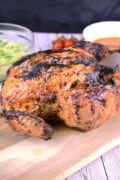
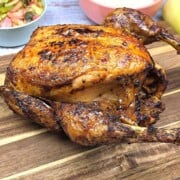
Forget dry, uninspired poultry. Making a crispy air fryer whole chicken is the ultimate shortcut to a rotisserie-style family dinner in under an hour. While this recipe is highly optimized for the Cosori air fryer-complete with specific preset tips for the Cosori XL-these exact times, temperatures, and our signature honey-glaze technique work beautifully in any standard air fryer basket.

Get ready for incredibly juicy meat and a mahogany-crisp skin that rivals your favorite gourmet rotisserie shop.
Jump to:
- Why This Air Fryer Whole Chicken Recipe Works
- Ingredients You'll Need
- Watch the Video Tutorial
- How to Cook a Whole Chicken in the Air Fryer (Step-by-Step)
- Air Fryer Whole Chicken Cooking Times by Weight
- Delicious Recipe Variations to Try
- Serving the Dish
- Expert Tips for the Ultimate Air Fryer Whole Chicken
- Frequently Asked Questions
- Let's Stay Connected!
- Related
- Crispy Air Fryer Whole Chicken (Rotisserie Style)
Why This Air Fryer Whole Chicken Recipe Works
- Massive Time & Effort Saver: This is hands-down the easiest way to get a comforting, hearty dinner on the table without turning on the big oven.
- Perfect for Meal Prep or Families: A standard 1.8kg (4 lb) bird easily yields 4 to 6 generous servings, depending on your side dishes.
- Guaranteed Texture: The rapid air circulation mimics a commercial rotisserie, locking in the natural juices while rendering the fat for perfectly crisp skin.
- Minimal Ingredients: No complicated grocery list here. You only need the chicken, a high-smoke-point oil, and a few pantry spices.
- Set It and Forget It: If you're using the Cosori XL Air Fryer, the built-in "Chicken" preset handles the logic for you so you don't have to babysit the kitchen.
Looking for more easy air fryer dinner inspiration? Try these tried-and-true reader favorites next:
- Juicy Air Fryer Pork Steak
- Perfect Air Fryer Teriyaki Salmon
- Garlic Butter Ribeye Steak in the Air Fryer
Ingredients You'll Need
To make this roasted chicken, you only need three core components. You can customize the spice blend to match your personal taste or whatever you have in your pantry.
- Whole Chicken (1.5 kg to 1.8 kg / 3.3 to 4 lbs): Look for a free-range or organic chicken for the best natural flavor. Ensure it is completely thawed, and remember to remove the giblets from the cavity before prepping.
- Sunflower Oil (or Olive Oil): You only need about 1-2 tablespoons. The oil acts as a binder to help the spices stick to the skin and conducts heat to ensure an even, golden-brown crunch.
- Your Favorite Spice Rub: A classic blend that works beautifully includes sea salt, freshly ground black pepper, garlic powder, vegetable mix and sweet paprika. (Feel free to add a pinch of dried thyme, rosemary, or your favorite all-purpose poultry seasoning).
- Honey (1 tablespoon): The secret weapon for that beautiful, mahogany rotisserie finish. Don't worry, it won't make the chicken taste sweet! Brushed on during the final few minutes of cooking, the sugars caramelize under the air fryer's intense heat for an incredible, crackly crunch.

Ingredient & Equipment Tips
- Size Matters for the Cosori: A 1.8 kg (4 lb) chicken is the sweet spot for the Cosori XL (5.5L/5.8QT) basket. It leaves enough room around the sides for the hot air to circulate freely. If your chicken is closer to 2.2 kg (5 lbs), it will still fit, but you may need to tie the legs tightly with kitchen twine so they don't touch the heating element.
- The Best Oils for Air Frying: Sunflower oil, avocado oil, and light olive oil are perfect because they have higher smoke points, meaning they won't smoke or burn during the 180°C (356°F) roasting process.

Watch the Video Tutorial
If you're a visual learner, watch how easy it is to prep, flip, and glaze this bird to perfection. I'll show you exactly how it fits into the Cosori basket and what that crispy honey-glazed skin looks like when it's done!
How to Cook a Whole Chicken in the Air Fryer (Step-by-Step)
Follow these straightforward steps for a foolproof dinner. While these instructions feature the Cosori controls, you can apply them to any air fryer brand.
1. Prep and Season the Chicken
- Dry completely: Use paper towels to pat the entire surface of the chicken completely dry. Do not skip this step-moisture is the enemy of crispy skin!
- Mix the rub: In a small bowl, combine the sunflower oil with your chosen spices to create a wet paste.
- Coat the bird: Massage the spiced oil all over the chicken, making sure to get into the crevices around the wings and thighs.

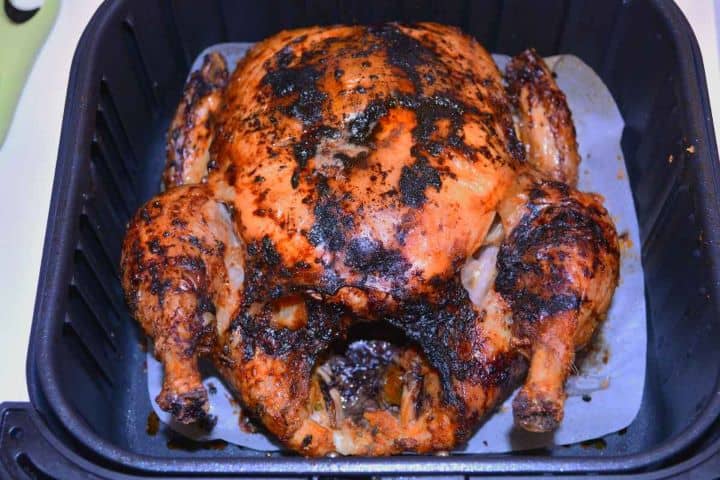
2. Place the Chicken Breast-Side Down
- Place the seasoned chicken into your air fryer basket breast-side down (backside up).
- Why this matters: Starting breast-side down allows the natural juices to pool into the breast meat while cooking, preventing the white meat from drying out.

3. The First Cook (The "Chicken" Preset)
- For Cosori Users: Select the Chicken preset button. By default, this sets the air fryer to 180°C (356°F) for 30 minutes. Press Start.
- For Other Air Fryers: Set the manual temperature to 180°C (356°F) and the timer for 30 minutes.
⚠️ Safety Reminder: If you plan to use parchment paper for easy cleanup, never place it in the basket during preheating without food on top. The powerful air current can lift the paper into the heating element and cause a fire hazard. Only add the paper right when you put the chicken in.

4. Flip and Roast Breast-Side Up
- Once the first 30-minute timer goes off, carefully flip the chicken over using silicone-tipped tongs or meat forks so it is now breast-side up.
- Cook for an additional 25 to 30 minutes at 180°C (356°F).

5. The Honey Glaze Finish
- Open the basket and brush the top of the chicken skin with your tablespoon of honey.
- Turn the temperature up to 190°C (375°F) and air fry for a final 3 to 5 minutes.
- Keep a close eye on it during these last few minutes! The honey will caramelize rapidly, turning the skin a stunning mahogany brown, but it can burn if left too long.
6. Rest and Temperature Check
- Insert a meat thermometer into the thickest part of the inner thigh and breast (avoiding the bone). It must read 74°C (165°F) to be safe to eat.
- Remove the chicken from the basket and place it on a cutting board. Let it rest for 10 minutes before carving. This gives the juices time to redistribute back into the meat instead of running out onto your board.
Air Fryer Whole Chicken Cooking Times by Weight
Because chickens come in all sizes, you shouldn't rely on a one-size-fits-all timer. Use this handy reference chart to adjust your cooking times based on the weight of your bird.
All times are based on a cooking temperature of 180°C (356°F).
| Chicken Weight (kg / lbs) | First Cook (Breast-Side Down) | Second Cook (Breast-Side Up) | Total Cooking Time |
| 1.2 kg (2.6 lbs) | 20 minutes | 20 minutes | 40 minutes |
| 1.4 kg (3.0 lbs) | 25 minutes | 20-25 minutes | 45-50 minutes |
| 1.6 kg (3.5 lbs) | 30 minutes | 25 minutes | 55 minutes |
| 1.8 kg (4.0 lbs) [Recipe Size] | 30 minutes | 25-30 minutes | 55-60 minutes |
| 2.0 kg (4.4 lbs) | 35 minutes | 30 minutes | 65 minutes |
| 2.2 kg (5.0 lbs) [Max Cosori Size] | 35 minutes | 35-40 minutes | 70-75 minutes |
🍯 When to add the honey glaze: Regardless of the chicken's size, always brush on your honey glaze during the last 3 to 5 minutes of the total cooking time, bumping the heat up to 190°C (375°F) for that final blast of crispiness.
🛑 The Golden Rule of Poultry Safety
While this chart provides accurate baselines, variations in air fryer models and chicken thickness can alter the exact timing. Always use a digital meat thermometer.
Your chicken is only fully cooked and safe to eat when the internal temperature reaches 74°C (165°F) in both the thickest part of the breast and the inner thigh (without touching the bone). If it hasn't reached this temperature yet, pop the basket back in for another 3 to 5 minutes at 180°C and check again.
Delicious Recipe Variations to Try
While the classic spice rub and honey glaze combo is a crowd-pleaser, you can easily change up the flavor profile of this air fryer roast chicken. Here are a few reader-favorite twists:
- Garlic & Herb Butter Chicken: Swap the sunflower oil for softened unsalted butter. Mix it with minced garlic, dried rosemary, thyme, and parsley. Rub this mixture under the chicken skin as well as on top for an ultra-rich, savory flavor, like in my garlic butter roasted chicken.
- Zesty Lemon Pepper Chicken: Skip the paprika and honey. Instead, rub the chicken with a generous amount of lemon pepper seasoning and garlic powder. Right before serving, squeeze fresh lemon juice over the crispy skin.
- Smoky BBQ Style: Mix your oil with a smoky BBQ rub (containing brown sugar, smoked paprika, onion powder, and a pinch of cayenne). Instead of honey, brush your favorite thick BBQ sauce over the chicken during the final 5 minutes of cooking at 190°C (375°F).
- Spicy Peri-Peri or Cajun: For a dinner with a kick, use a pre-made Cajun or Peri-Peri spice blend. If you like it sweet and spicy, keep the final honey glaze to balance out the heat.
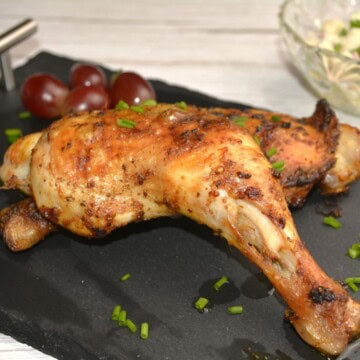
Serving the Dish
Once your chicken has finished resting for 10 minutes (don't skip this, or all the delicious juices will run out!), it's time to carve. Use a sharp chef's knife to separate the drumsticks and wings first, then slice down along the breastbone to carve out beautiful, thick slices of juicy white meat.
Perfect Side Dishes to Pair with It
This rotisserie-style chicken is incredibly versatile and pairs perfectly with almost any side dish. Here are a few ideas to turn it into a complete family meal:
- Air Fryer Roasted Potatoes: While your chicken rests, throw some cubed Yukon Gold or baby potatoes into the air fryer basket. They will cook beautifully in the leftover chicken drippings and get incredibly crispy in about 12-15 minutes.
- Classic Comforts: Serve the chicken alongside a mountain of creamy mashed potatoes, French fries, steamed green beans, and a generous pour of warm chicken gravy.
- Light and Fresh: Pair the juicy breast meat with a crisp Mediterranean salad, a simple Caesar salad, my best potato salad with homemade mayonnaise, or roasted asparagus drizzled with lemon juice.
- Grains and Veggies: Serve it over a bed of fluffy quinoa, wild rice, or garlic-herb couscous with a side of roasted carrots.
What to Do with Leftovers
If you have leftover chicken, you are in luck! This meat stays incredibly tender and is perfect for meal prep the next day. Shred the leftovers and use them for:
- High-protein chicken salad sandwiches like my best homemade chicken salad.
- Creamy chicken Alfredo pasta
- Cozy homemade chicken noodle soup
- Quick weeknight chicken tacos or quesadillas

How to Store and Reheat Leftover Chicken
To make sure your leftover chicken stays as safe, juicy, and delicious as it was on day one, follow these simple storage and reheating guidelines.
Storing in the Refrigerator
- Cool it down first: Allow the chicken to come to room temperature before packing it away. Putting hot chicken directly into a cold fridge creates condensation, which makes the skin soggy and can promote bacteria growth.
- Container choice: Place the carved pieces or the remaining carcass into a shallow, airtight container or wrap it tightly in heavy-duty aluminum foil.
- Shelf life: Stored properly, cooked chicken will stay fresh in the refrigerator for 3 to 4 days.
Can You Freeze Air Fryer Chicken?
Yes! If you can't finish it within 4 days, you can freeze it.
- Shred or carve the meat off the bone first (this saves freezer space and makes thawing easier).
- Place the meat into a heavy-duty freezer bag, squeeze out as much air as possible, and label it with the date.
- It will keep beautifully in the freezer for up to 3 months. Thaw it overnight in the fridge before reheating.
How to Reheat (And Keep the Skin Crispy!)
Avoid the microwave! Microwaving leftover chicken makes the meat rubbery and the skin completely soggy. Instead, use your air fryer to bring that crackly texture back to life:
- 1. Preheat your air fryer to 175°C (350°F).
- 2. Place the leftover chicken pieces in a single layer in the basket.
- 3. Air fry for 3 to 5 minutes until the meat is warmed through and the skin starts to sizzle again.
- 4. Optional Pro Tip: If the meat seems a bit dry, brush a tiny amount of olive oil or a splash of chicken broth over it before popping it into the basket.

Expert Tips for the Ultimate Air Fryer Whole Chicken
To ensure your chicken comes out looking like a professional rotisserie bird every single time, keep these tried-and-true kitchen tips in mind:
- Tuck the Wings: The heating element in an air fryer is right at the top of the basket. To prevent the wingtips from burning during the hour-long cook, tuck them tightly underneath the body of the chicken before placing it in the basket.
- Don't Overcrowd the Basket: For the skin to get maximum crispiness, the hot air needs to circulate 360 degrees around the bird. Ensure your chicken isn't completely jammed against the side walls of your air fryer. If it's a tight fit, tie the legs together with kitchen twine to keep the bird compact.
- Bring the Chicken to Room Temp: Try to take your chicken out of the fridge about 20-30 minutes before cooking. If you put an ice-cold chicken straight into a hot air fryer, the outside will cook (and potentially burn) before the inside reaches a safe temperature.
- The "Dry Brine" Shortcut: If you have the time, season your chicken with salt and leave it uncovered on a plate in the fridge for 2 to 4 hours before cooking. The fridge air dries out the skin perfectly, leading to an incredibly loud, crackly crunch when air fried.
- Trust the Thermometer, Not the Timer: Every air fryer runs slightly differently based on its wattage and age. The times listed in any recipe are a guide. Always rely on an instant-read meat thermometer inserted into the thickest part of the thigh-it should read exactly 74°C (165°F).
Frequently Asked Questions
You should always start cooking a whole chicken breast-side down (backside up). This allows the natural juices and fat to drain downward into the breast meat, keeping the white meat incredibly tender and juicy. Flip the chicken breast-side up for the second half of the cooking time to get the skin golden and crisp.
For a standard 1.8 kg (4 lb) chicken, it takes roughly 55 to 60 minutes at 180°C (356°F) in a Cosori XL air fryer. Always check the internal temperature with a digital meat thermometer; it is fully cooked and safe to eat once it reads 74°C (165°F) in the thickest part of the meat.
Yes, you can use parchment paper or aluminum foil in the air fryer basket to make cleanup easier, but you must follow one strict safety rule: Never preheat the air fryer with paper or foil inside alone. The powerful air circulation can lift the liner into the heating element and cause a fire. Only add the liner right when you are ready to place the heavy chicken on top of it.
Air fryer chicken usually turns out dry for two reasons: it was either overcooked or cooked breast-side up the entire time. To prevent dry meat, always start the chicken breast-side down, pull it out of the air fryer the exact moment it hits an internal temperature of 74°C (165°F), and let it rest for 10 minutes before carving so the juices don't escape.
It is not recommended to cook a completely frozen whole chicken in the air fryer. Because a whole bird is so thick, the outside will burn long before the inside thaws and reaches a safe cooking temperature, leaving you with dangerously undercooked poultry near the bone. Always thaw your chicken completely in the refrigerator before air frying.
Let's Stay Connected!
If you made this crispy air fryer whole chicken, I would love to see how it turned out! Leave a comment down below, or snap a quick photo and tag us so we can share your kitchen wins. To make sure you never miss a new recipe, time-saving kitchen hack, or step-by-step video guide, come join our growing community of food lovers. You can follow us on Facebook and Instagram for daily dinner inspiration, save your favorite recipes on Pinterest, and subscribe to our YouTube Channel so you always have a visual guide ready for your next meal. Happy air frying!
Related
The Cosori Air fryer whole chicken recipes are delicious among the family's preferences, so I recommend some more delicious chicken recipes from our blog:


Crispy Air Fryer Whole Chicken (Rotisserie Style)
Equipment
- 1 Cosori Air Fryer XXL
- 1 parchment paper
Ingredients
For the Chicken:
- 1.8 kg whole chicken free range, fully thawed and giblets removed
- 1 tablespoon sunflower oil or any vegetable oil
- 1 tablespoon honey for the final glaze
For the Spice Rub:
- 1 teaspoon thyme dried
- 1 teaspoon sea salt kosher
- ½ teaspoon ground pepper freshly ground
- 1 teaspoon paprika sweet Hungarian
- ½ teaspoon garlic powder or granules
- 1 teaspoon vegetable mix such as Vegeta or similar
Instructions
- Step 1: Pat the entire surface of the whole chicken completely dry with paper towels. Do not skip this-moisture prevents the skin from getting crispy.1.8 kg whole chicken, 1 tsp thyme, 1 tsp sea salt, ½ tsp ground pepper, ½ tsp garlic powder, 1 tsp vegetable mix, 1 tbsp sunflower oil
- Step 2: In a small bowl, combine the sunflower oil with the sea salt, black pepper, garlic powder, sweet paprika, vegetable mix seasoning, and dried thyme to create a wet rub paste.
- Step 3: Massage the spice rub paste all over the chicken, ensuring you coat the wings, legs, and crevices evenly.
- Step 4: Place the chicken into the air fryer basket breast-side down (backside facing up) to keep the breast meat juicy during the initial cook.
- Step 5: For Cosori Users: Select the Chicken preset (180°C / 356°F for 30 minutes) and press Start. For other air fryers: Manually set to 180°C (356°F) and air fry for 30 minutes.1 tbsp honey
- Step 6: Carefully flip the chicken over using silicone-tipped tongs or meat forks so it is now breast-side up. Set your air fryer to 180°C (356°F) and cook for an additional 25 to 30 minutes.
- Step 7: Open the basket and brush the top of the chicken skin with 1 tablespoon of honey. Increase the air fryer temperature to 190°C (375°F) and cook for a final 3 to 5 minutes until the skin turns a deep, mahogany brown.
- Step 8: Insert a digital meat thermometer into the thickest part of the inner thigh and breast. Once it registers a safe internal temperature of 74°C (165°F), remove the bird from the basket.
- Step 9: Let the chicken rest on a cutting board for 10 minutes before carving to allow the juices to redistribute back into the meat.
Video
Notes
- Parchment Paper & Foil Safety: Never place parchment paper or aluminum foil into the air fryer basket during preheating while it is empty. The intense air circulation will lift the liner into the upper heating element, causing a severe fire hazard. Only add your liner when you are immediately placing the heavy chicken on top of it.
- Cosori Basket Sizing & Trussing: A 1.8 kg (4 lb) chicken is the absolute sweet spot for the Cosori XL basket, as it allows optimal 360-degree air circulation. If your bird is closer to 2.2 kg (5 lbs), tie the legs tightly together with kitchen twine to keep the bird compact and prevent the legs or wings from touching the upper heating elements.
- Preventing Dry Breast Meat: Starting the chicken breast-side down allows the natural fats and juices to render downward into the breast meat while it cooks. Flipping it breast-side up halfway through ensures you get incredibly juicy white meat and an evenly browned, crispy exterior.
- The Honey Glaze Rule: Honey contains high amounts of natural sugar, which burns quickly under intense heat. Always wait until the last 3 to 5 minutes of the total cooking time to brush on the honey glaze, and keep a close eye on the basket during this final stretch.
- The Perfect Reheat: Avoid the microwave for leftovers, as it turns the skin soggy and makes the chicken rubbery. Instead, place leftover pieces in a single layer in the air fryer basket and reheat at 175°C (350°F) for 3 to 5 minutes to fully restore the crispy, crackly texture.
- Internal Temperature: Always trust a digital food thermometer over the timer, as air fryer wattages can vary. The chicken is safe and ready to pull once it reaches 74°C (165°F) in the thickest part of the inner thigh and breast (without touching the bone). Feel free to use maple syrup or brown sugar dissolved in a splash of warm water if you run out of honey.
Nutrition
This post contains affiliate links. Read the full disclosure here.


Roberta Doctor says
This was the first thing I made in our air fryer aa- and it did not disappoint! The hardest part was turning the chicken over midway through cooking it!
James says
@Roberta Doctor, just received my new cosori dual 6.4 litre blaze, your chicken demerstration
Looks great. Will try it shortly, having difficulty, finding recipes for this dual blaze.
Best wishes,
James.
Theresa Inziello says
Just one problem with this recipe. Preheat without the parchment paper. It will catch fire ecause of the air circulation in the fryer.
Hope this is helpful.
Laci says
Thank you, Theresa. Yes, it's true; preheating the air fryer is done without baking paper.