
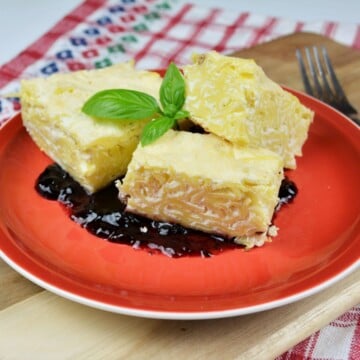
If you are looking for a magically simple, light, and creamy dessert, this gluten-free yoghurt cake is about to become your new favorite bake. Made with just 4 base ingredients and requiring less than 5 minutes of hands-on prep, this flourless yoghurt cake bakes into a delicate, crustless treat that tastes like a cross between a soufflé and a light cheesecake.

It is the ultimate easy gluten-free dessert for busy days. While the base cake requires only four pantry staples, it is incredibly easy to customize-I love dressing mine up with a handful of sweet raisins and juicy apricots, but you can leave it plain or use whatever seasonal fruit you have on hand.
Jump to:
- The Simple Ingredients You'll Need
- How to Make This Gluten-Free Yoghurt Cake (Step-by-Step)
- Fun Recipe Variations to Try
- How to Serve This Yoghurt Cake
- Storage & Freezing Tips
- Timea's Top Tips for the Perfect Yoghurt Cake
- Frequently Asked Questions & Troubleshooting
- Love Creamy Desserts? Try These Next!
- Join the Timea's Kitchen Community!
- Related
- 4-Ingredient Gluten-Free Yoghurt Cake
While this light and refreshing bake is a crowd-pleaser all year round, it is especially popular during the spring and summer months when you want a dessert that feels bright and effortless. It also makes a fantastic, elegant addition to an Easter Sunday spread or a sunny weekend brunch. The inspiration for this recipe actually came from my popular Russian Cheesecake, where I discovered just how magical simple dairy bases can be in gluten-free baking. If you are building a complete menu, this cake serves as the perfect, light palate cleanser and pairs beautifully right after a meal featuring this amazing Authentic Hungarian Beef Goulash.
The Simple Ingredients You'll Need
One of the best things about this flourless yoghurt cake is that it relies entirely on basic pantry staples. To make the magic base recipe, you only need 4 core ingredients.
The 4 Base Ingredients
- Greek Yoghurt: The star of the show! For the best texture, use a thick, full-fat Greek yoghurt (around 10% fat works beautifully). This provides the rich, creamy, custard-like structure since we aren't using traditional flour or butter.
- Eggs: You will need medium or large eggs at room temperature. Because this cake is crustless and flourless, the eggs act as the primary structural binding agent, helping the cake puff up elegantly in the oven.
- Cornstarch (Cornflour): This is our secret weapon to keeping the recipe entirely gluten-free. It stabilizes the liquid from the yoghurt and eggs, ensuring the cake sets into a smooth, sliceable texture without becoming dense.
- Sugar: Standard granulated sugar or caster sugar works perfectly here to add just the right amount of sweetness to balance the natural tanginess of the yoghurt.

Optional Add-ins & Fruit Variations
While the 4-ingredient base is delicious on its own, you can easily upgrade the flavor profile with these simple, gluten-free additions:
- Vanilla Extract: A teaspoon of high-quality vanilla extract or vanilla paste adds a lovely warmth to the batter.
- Dried Raisins: A small handful of sweet raisins adds a wonderful texture contrast to the creamy cake.
- Chopped Apricots: I love topping this cake with vibrant, juicy chopped apricots. They sink slightly into the batter as it bakes, creating beautiful, fruity pockets of flavor in every bite.
💡 Timea's Kitchen Baking Tip
Make sure your yoghurt and eggs are at room temperature before you begin mixing. If they are too cold straight from the fridge, the batter won't emulsify as smoothly, which can affect how evenly the cake rises.
How to Make This Gluten-Free Yoghurt Cake (Step-by-Step)
If you have five minutes, you can get this cake ready for the oven. While the process is incredibly straightforward, watching the texture come together can be super helpful, especially if you want to see exactly how smooth the batter should look before baking.
You can watch the full recipe video right here on my YouTube channel:
Follow these simple steps to ensure your crustless yoghurt cake turns out beautifully light and creamy every single time:
1. Whisk the eggs and sugar
In a large mixing bowl, beat the eggs and sugar together using a hand whisk or electric mixer until the mixture becomes slightly pale and frothy. This builds a bit of air into our flourless base.

2. Incorporate the yoghurt and starch
Add the thick Greek yoghurt and cornstarch to the bowl. If you are using vanilla extract, add it now. Whisk vigorously until the batter is completely smooth, creamy, and entirely free of any cornstarch lumps.

3. Add the optional fruit
If you are using raisins, gently fold them directly into the yoghurt batter. Pour the smooth batter into an 8-inch (20cm) cake tin lined completely with baking parchment. Finally, gently arrange your chopped apricots right on top of the batter. Some will sink slightly during baking, creating lovely fruity pockets!

4. Bake until golden
Bake in a preheated oven at 180°C (350°F) for around 35 to 40 minutes. The top should be beautifully golden brown, and the center should have just a very slight, jelly-like jiggle when you move the pan.

5. Cool and chill to set
Remove the cake from the oven and let it cool completely to room temperature in the tin. Don't panic if it deflates slightly as it cools-this is perfectly normal for a flourless, crustless bake! Once cool, place it in the fridge for at least 2 hours to completely set before slicing into a texture that resembles a rich, cold custard or light cheesecake.

Fun Recipe Variations to Try
The beautiful thing about this 4-ingredient custard-like base is how incredibly versatile it is. Once you master the simple base recipe, you can easily adapt it to match the season or whatever ingredients you have in your kitchen. Here are a few of my favorite twists:
- Zesty Citrus Explosion: For a bright, refreshing flavor profile, skip the fruits and fold the finely grated zest of one large lemon or orange directly into the batter before baking. It cuts through the richness of the yoghurt beautifully and smells amazing while baking.
- Berry Bliss: Replace the apricots and raisins with a cup of fresh or frozen blueberries, raspberries, or blackberries. Toss them in a tiny pinch of cornstarch before folding them in-this prevents them from sinking straight to the bottom of the tin.
- The Sugar-Free Option: If you are looking for a lighter or lower-calorie treat, you can easily swap the standard granulated sugar for your favorite 1:1 granulated sugar alternative (such as an erythritol or stevia baking blend). The cake keeps its lovely, creamy structure perfectly.
- Chocolate Chip & Vanilla: Double up on the vanilla extract and fold in a generous handful of mini dark chocolate chips. It creates a beautiful stracciatella effect that is always a massive hit with kids and chocolate lovers alike.
Pro Customization Tip:
If you decide to use fresh, juicy fruits like plums or strawberries, slice them thinly and pat them completely dry with a paper towel before placing them on top of the batter. Too much surface moisture can alter how the top of the cake browns.
How to Serve This Yoghurt Cake
Because this flourless yoghurt cake is crustless and has a delicate, custard-like texture, it is best served chilled straight from the fridge. When cold, it slices beautifully and holds its shape perfectly.
Here are a few elegant ways to dress it up right before serving:
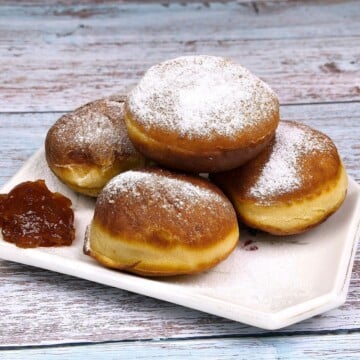
- A Simple Dusting: Keep it classic with a light dusting of powdered sugar (icing sugar) right before slicing.
- Fresh Berry Accompaniment: Serve each slice with a generous side of fresh strawberries, raspberries, or a simple homemade berry coulis to cut through the creaminess of the yoghurt.
- A Dollop of Cream: Pair it with a spoonful of lightly whipped cream or even an extra dollop of vanilla Greek yoghurt for a truly decadent dessert experience.
- A Warm Beverage: This cake makes the ultimate afternoon treat alongside a hot cup of coffee or a floral Earl Grey tea.
💡 Serving Tip
When slicing the cake, wipe your knife with a clean, damp paper towel between each cut. This ensures clean, picture-perfect slices every single time!

Storage & Freezing Tips
Since this recipe relies heavily on dairy, proper storage is key to keeping it fresh, moist, and delicious.
- In the Fridge: Store any leftover slices in an airtight container in the refrigerator. It will stay fresh, firm, and absolutely delicious for up to 3 to 4 days. In fact, many people find that the flavors develop and it tastes even better on day two!
- Can You Freeze It? Because of the high moisture content in Greek yoghurt and the lack of a traditional flour structure, we do not recommend freezing this cake. When frozen and thawed, the dairy can separate, which changes the texture from smooth and velvety to slightly watery. It is definitely best enjoyed fresh from the fridge!

Timea's Top Tips for the Perfect Yoghurt Cake
To make sure your flourless yoghurt cake turns out perfectly velvety and smooth on your very first try, keep these essential baker's tips in mind:
- Line the Pan Fully: Because this cake is completely crustless and delicate, it will stick if you just grease the tin. For the best results, line both the bottom and the sides of your cake tin with baking parchment (baking paper). Leave a little bit of paper overlapping the top edge so you can easily lift the chilled cake out.
- Stick to Full-Fat Greek Yoghurt: The secret to the rich, cheesecake-like texture is the fat content. Try to use a thick Greek yoghurt with around 10% fat. Low-fat or watery yoghurts contain too much liquid, which can cause the cake to turn out soggy or separate in the oven.
- Whisk Out the Lumps: Cornstarch loves to clump up. When you add it to the bowl, make sure to whisk the batter vigorously until it is entirely smooth and glossy before pouring it into your tin.
- Don't Panic When It Sinks: This is the most important tip! Because this recipe is flourless and relies on eggs for height, it will puff up like a giant soufflé in the oven and then sink down in the center as it cools. This is 100% normal and is exactly what gives the cake its dense, rich, and creamy custard texture.
- The Slicing Secret: Do not try to slice this cake while it is warm. It needs that mandatory 2-hour chill time in the fridge to firmly set.
Frequently Asked Questions & Troubleshooting
Don't worry, you haven't done anything wrong! Because this cake is entirely flourless and crustless, it relies purely on the eggs to lift it in the oven. It will puff up beautifully like a soufflé while baking, and then naturally sink down in the center as it cools. This collapsing process is completely normal and is exactly what creates that ultra-dense, creamy, cheesecake-like texture we want.
I highly recommend sticking to a thick, full-fat Greek yoghurt (around 10% fat). Regular natural yoghurt contains a lot of liquid whey. If you use it straight from the tub, your cake batter will be too wet, and the cake may turn out soggy or fail to set properly. If you only have regular yoghurt, you will need to strain it through a cheesecloth for a few hours first to remove the excess liquid.
If you don't have cornstarch on hand, the best 1:1 gluten-free substitutes are arrowroot powder or potato starch. Both of these work similarly to stabilize the liquids and give the cake its clean, sliceable structure. Avoid using regular gluten-free flour blends here, as they will absorb too much moisture and make the cake dry and heavy.
If you notice water separating from the cake after it cools, it usually means one of two things: either you used a low-fat yoghurt with too much water content, or the fresh fruit you used on top released too much juice. To prevent this, always stick to thick Greek yoghurt, and if you use juicy fruits like fresh apricots or berries, pat them completely dry with a paper towel before adding them to the batter.
You can experiment with a thick, coconut-based or soy-based Greek-style yoghurt alternative. Just ensure the dairy-free yoghurt you choose is thick and has a decent fat content so the cake holds its structure.
Love Creamy Desserts? Try These Next!
If you enjoyed the light, custard-like texture of this flourless yoghurt cake, I highly recommend checking out some of our other favorite creamy, gluten-free friendly bakes from the blog:
- Classic Basque Cheesecake: Just like this yoghurt cake, this famous Spanish cheesecake is completely crustless, beautifully golden on top, and features a rich, creamy center.
- The Best Russian Cheesecake Recipe: A magnificent, dairy-forward traditional cake that is always a showstopper on the dessert table.
- Best Raspberry Cheesecake Recipe: If you love the combination of sweet creaminess and tart fruit (like the apricots in this recipe), this raspberry version is an absolute must-try.
- Cream Cheese Filling Crepes Recipe: Looking for something quick and elegant? These delicate crepes feature a rich, velvety sweet cheese filling that melts in your mouth.
Join the Timea's Kitchen Community!
We hope you love this light and creamy yoghurt cake as much as we do! If you give it a try, we would love to see your beautiful creations-be sure to snap a photo and tag us so we can see how it turned out. To stay updated with all our latest gluten-free bakes, traditional family recipes, and daily kitchen inspiration, make sure to follow us over on Facebook, Instagram, and Pinterest. And, of course, don't forget to subscribe to our YouTube Channel so you never miss a step-by-step video recipe.
Happy baking, and see you in the next recipe!
Related
Looking for other dessert recipes like this, in Timea's Kitchen style? Try these:


4-Ingredient Gluten-Free Yoghurt Cake
Equipment
- 1 mixing bowl
- 1 electric mixer
- 1 springform cake pan
Ingredients
Group 1: The 4 Base Ingredients
- 600 g Greek yoghurt full-fat, approx. 10% fat
- 6 pieces eggs free range
- 60 g corn starch cornflour
- 100 g sugar granulated
Group 2: Optional Mix-ins & Toppings
- 250 g apricots fresh or canned, pitted and chopped
- 50 g raisins
- 1 teaspoon vanilla essence or extract
Instructions
- Prep the Oven & Pan: Pre-heat your oven to 180°C (350°F) and fully line an 8-inch (20cm) cake tin with baking parchment.
- Whisk Eggs & Sugar: In a large bowl, whisk the eggs and granulated sugar together until pale, frothy, and slightly increased in volume.
- Add Base Ingredients: Add the Greek yoghurt, cornstarch, and vanilla extract (if using) to the bowl. Whisk vigorously until the batter is completely smooth and free of lumps.
- Assemble: Gently fold the raisins into the batter. Pour the mixture into your prepared cake tin, and arrange the chopped apricots evenly over the top.
- Bake: Bake for 35 to 40 minutes until the top is deep golden brown and the center has a slight, jelly-like jiggle.
- Chill & Serve: Let the cake cool completely in the tin at room temperature, then transfer it to the refrigerator for at least 2 hours to set firmly before slicing.
Video
Notes
- Yoghurt Choice: For the absolute best texture, stick to a thick, full-fat Greek yoghurt (around 10% fat). Avoid runny natural yoghurts or low-fat versions, as the excess water content can prevent the flourless cake from setting properly.
- Room Temperature: Ensure your eggs and yoghurt are at room temperature before mixing. Cold ingredients straight from the fridge can cause the cornstarch to clump and the batter to separate.
- The "Sinking" Effect: Do not panic when your cake deflates! Because this recipe uses eggs instead of flour for structure, it will puff up beautifully like a soufflé in the oven and then sink significantly in the middle as it cools. This is exactly what gives it its dense, rich, creamy texture.
- Fruit Prep: If you are customizing this with fresh, juicy fruits (like apricots, plums, or strawberries), pat the sliced pieces completely dry with a paper towel before placing them on top of the batter. This prevents excess moisture from pooling on the cake.
- Clean Slices: To get gorgeous, bakery-style slices, make sure the cake has chilled in the fridge for at least 2 hours. Wipe your knife with a warm, damp cloth between every single cut.
- Storage: Keep leftovers in an airtight container in the refrigerator for up to 4 days. Freezing is not recommended, as the dairy structure will break down and become watery upon thawing.
Nutrition
This post contains affiliate links. Read the full disclosure here.
Leave a Reply